Introduction
In this tutorial, we will guide you through the process of recording Teams call effortlessly. Microsoft Teams has become one of the most popular platforms for communication and collaboration, and being able to record calls can be extremely valuable for various reasons. Whether you want to capture important discussions, keep track of project updates, or review training sessions, the ability to record Teams calls can prove to be an indispensable feature. Follow the steps below to start recording your Teams calls today.
Understanding the Importance of Recording Teams Calls
Recording Teams calls can have a multitude of benefits. Not only does it enable you to have a comprehensive record of important conversations, but it also allows participants to review the discussions at a later time. Moreover, recorded calls can serve as valuable training materials, helping new team members get up to speed quickly. Additionally, recording calls can be useful for those who are unable to attend a meeting, ensuring that they won't miss out on any crucial information. With these advantages in mind, let's delve into the steps of recording Teams calls.
Setting up the Recording Feature
1. Open the Microsoft Teams app on your device and sign in to your account.2. Go to the Settings menu by clicking on your profile picture in the top-right corner of the screen.3. From the dropdown menu, select "Settings."4. In the settings menu, navigate to the "Permissions" tab.5. Under the "Permissions" tab, locate the "Recording" section.6. Toggle the button to enable the recording feature.7. Save your changes.Once you have completed these steps, you have successfully set up the recording feature in Microsoft Teams.
Recording a Teams Call
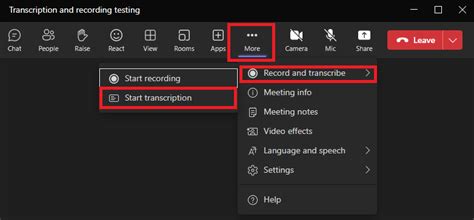
1. Start your Teams call as you normally would by initiating or joining a meeting.2. Once the call has begun, you will notice a set of icons at the bottom of the screen. Look for the "More actions" button, which appears as three horizontal dots. Click on it.3. From the dropdown menu, select "Start recording."The recording will now begin, indicated by a small red dot or "Recording" label displayed on the screen. Remember to inform all participants that the call is being recorded to ensure compliance with legal and ethical requirements.
Accessing and Managing Recorded Calls
1. After ending the call, the recording will automatically be saved to the Microsoft Teams cloud storage.2. To access the recorded call, go to the chat tab within Teams and find the chat message related to the call.3. Within the chat message, you will find the recording as an attachment. Click on the attachment to play or download the file.4. You can also share the recording with other team members by forwarding the chat message containing the recording.5. If needed, you can delete the recording by right-clicking on the chat message and selecting "Delete."As an alternative to accessing the recording through Teams, you can also access it through Microsoft Stream, the video hosting service integrated with Teams.
Conclusion
Recording Teams calls can play a significant role in maintaining effective communication and collaboration within your team. Whether it's for knowledge sharing, training purposes, or documentation, the ability to record calls offers numerous benefits. By following the simple steps outlined in this tutorial, you can easily set up and utilize the recording feature in Microsoft Teams. Ensure that you use this feature responsibly and communicate with all participants about the call being recorded. Start recording your Teams calls today and unlock the potential for seamless information sharing and improved productivity.
No comments:
Post a Comment