Step 1: Unpacking and Setting Up the Fire TV Cube
When you first receive your Fire TV Cube, you'll need to unpack it and set it up properly. Begin by carefully removing the device from its packaging and gathering all the necessary components. Make sure you have the Fire TV Cube, power adapter, HDMI cable, and remote control.
Step 2: Connecting the Fire TV Cube to Your TV
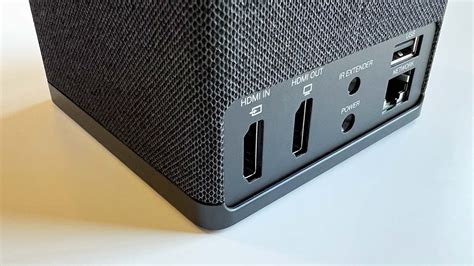
To connect the Fire TV Cube to your TV, first locate an available HDMI port on your television. Insert one end of the HDMI cable into the port on the Fire TV Cube and the other end into the HDMI port on your TV. Ensure that the cable is securely connected.
Step 3: Powering Up the Fire TV Cube
Next, connect the power adapter to the Fire TV Cube and plug it into a power outlet. Once the device is connected to power, it will automatically power up. You should see the Fire TV logo appear on your TV screen, indicating that the device is starting up.
Step 4: Pairing the Fire TV Cube Remote
After the Fire TV Cube has started up, it's time to pair the included remote control. Press and hold the voice button on the remote (located at the top) until the blue light on the front of the remote starts flashing. The Fire TV Cube will automatically detect the remote and pair with it. Once paired, the blue light on the remote will stop flashing.
Step 5: Configuring Wi-Fi and Network Settings
To fully utilize the Fire TV Cube's features, you'll need to connect it to your Wi-Fi network. On your TV, navigate to the network settings menu using the Fire TV Cube remote. Select your Wi-Fi network from the list of available networks and enter the password if prompted. The Fire TV Cube will connect to your Wi-Fi network, enabling access to various streaming services and online content.
Step 6: Setting Up the Fire TV Cube Voice Assistant
One of the key features of the Fire TV Cube is its built-in voice assistant, which allows you to control your TV with voice commands. To set it up, follow the on-screen instructions after connecting to Wi-Fi. You'll be prompted to enable the voice recognition feature and personalize your settings.

Step 7: Exploring and Customizing Your Fire TV Cube
Once you have successfully connected and set up your Fire TV Cube, it's time to explore and customize its features. Navigate through the intuitive user interface, browse through various apps and streaming services, and personalize your home screen layout. You can also install additional apps and games from the Amazon Appstore to enhance your streaming experience.
Step 8: Troubleshooting Common Issues
If you encounter any issues during the setup process or while using your Fire TV Cube, here are a few troubleshooting tips: - Ensure that your TV is set to the correct HDMI input.- Double-check that all connections are secure and properly inserted.- Restart your Fire TV Cube by unplugging it from power for a few seconds and then plugging it back in.- Make sure your Wi-Fi network is stable and functioning properly.- If you're experiencing issues with the voice assistant, try re-pairing the remote control.In conclusion, connecting your Fire TV Cube to your TV is a straightforward process that requires a few simple steps. By following this step-by-step tutorial, you can quickly set up and enjoy the versatile capabilities of your Fire TV Cube. Remember to explore the different features, customize your settings, and troubleshoot any potential issues for a seamless streaming experience.
No comments:
Post a Comment