Introduction
The system utilities screen is a crucial tool that allows users to manage and troubleshoot various aspects of their computer system. Whether you are experiencing performance issues or need to customize settings, accessing this screen is essential. In this tutorial, we will guide you through the step-by-step process of reaching the system utilities screen on different operating systems and demonstrate its functionalities.
Accessing System Utilities Screen on Windows
Windows provides a user-friendly way to reach the system utilities screen. To access it, follow these steps:1. Open the Start menu by clicking on the Windows logo located at the bottom-left corner of the screen.2. Type "Control Panel" in the search bar and click on the corresponding result.3. In the Control Panel window, locate and click on the "System and Security" option.4. Within the "System and Security" section, find and select "Administrative Tools."5. Finally, in the Administrative Tools window, you will find various system utilities that you can access and utilize accordingly.
Accessing System Utilities Screen on macOS
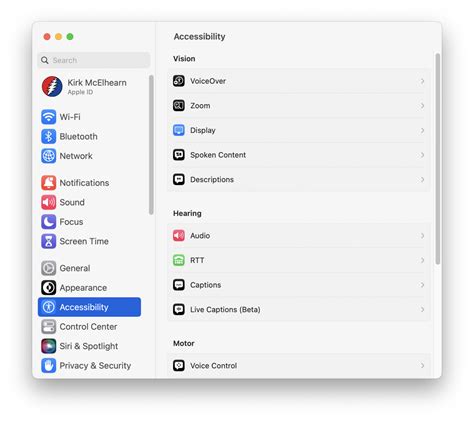
macOS offers a streamlined approach to reach the system utilities screen. To access it, follow these steps:1. Click on the Apple menu located at the top-left corner of the screen.2. From the drop-down menu, select "System Preferences."3. In the System Preferences window, click on the "System" icon.4. Within the "System" section, locate and select the "Utilities" folder.5. Inside the Utilities folder, you will find various system utilities that can be utilized to manage and optimize your macOS system.
Accessing System Utilities Screen on Linux
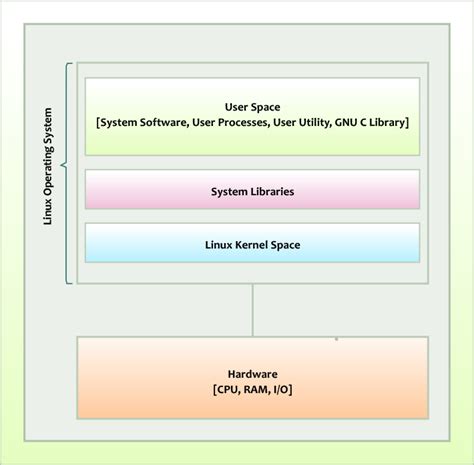
Linux distributions offer flexibility and customization options. To access the system utilities screen on Linux, follow these steps:1. Launch the "Terminal" application by either searching for it in your applications menu or using the keyboard shortcut (Ctrl+Alt+T).2. Once the Terminal opens, type in the command "sudo -i" to switch to the root user.3. Enter your administrator password when prompted.4. After becoming the root user, run the command "system-config" to open a graphical utility that allows you to access and manage system settings.
Common System Utilities and their Functionality
Now that you know how to access the system utilities screen, let's explore some commonly used utilities and their functionalities:1. Task Manager: A powerful utility that enables you to monitor and manage active processes, performance, and system resource usage.2. Disk Cleanup: This utility helps you free up disk space by removing unnecessary files, temporary internet files, and system-generated junk.3. Device Manager: Allows you to view and manage hardware devices installed on your system, diagnose device-related issues, update drivers, and more.4. System Restore: A utility that creates restore points, enabling you to revert your system settings and configurations to a previous state in case of errors or software issues.5. Network Diagnostics: Helps identify and troubleshoot network-related problems by running diagnostic tests and providing insights into connectivity issues.In conclusion, accessing the system utilities screen is essential for maintaining, optimizing, and troubleshooting your computer system. By following the provided steps, you can easily reach this screen on Windows, macOS, and Linux. Familiarizing yourself with the various system utilities available will empower you to address any potential issues efficiently and keep your system running smoothly.Remember to regularly utilize the system utilities screen, as it plays a vital role in ensuring your computer's performance and longevity.
No comments:
Post a Comment