Understanding Green Screen Editing
Green screen editing is a technique used in video production to replace a solid colored background, usually green, with a different image or video. It allows creators to place subjects in different settings or environments, giving their videos a professional and polished look. In this tutorial, we will guide you through the process of editing green screen footage using Canva, a popular online graphic design tool.
Getting Started with Canva
To start editing green screen footage in Canva, you will first need to create a Canva account or log in to your existing account. Canva offers both free and paid plans, with the paid plans offering more advanced features and options. Once you have logged in, you can begin the editing process.
Importing Green Screen Footage
Before you can edit green screen footage, you need to import it into Canva. To do this, click on the "Uploads" tab on the left side menu in Canva and select the green screen footage file from your computer. Canva supports various video file formats, so make sure your green screen footage is in a compatible format.
Placing Green Screen Footage on the Canvas
Once your green screen footage is imported, you can simply drag and drop it onto the Canva canvas. Canva will create a new layer for the footage, allowing you to easily work with it. You can resize and reposition the footage as needed to fit your desired composition.
Adding a Green Screen Effect
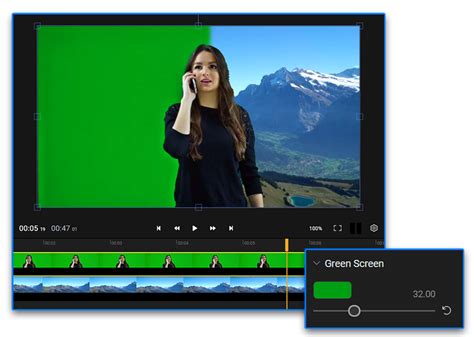
To replace the green background of your footage with a different image or video, you need to apply the green screen effect in Canva. Select the green screen footage layer and click on the "Effects" tab in the toolbar. From the effects menu, choose the "Green Screen" option.
Choosing a Background Image or Video
After applying the green screen effect, you can now choose the background image or video that will replace the green screen. Click on the "Photos" or "Videos" tab in the Canva toolbar to access the library of media assets. Browse through the collection and select the desired background image or video.
Blending the Layers
To blend the green screen footage with the selected background, adjust the opacity and blend mode of the footage layer. Click on the green screen footage layer and navigate to the "Opacity" and "Blend Mode" options in the toolbar. Experiment with different settings until you achieve the desired result.
Adding Additional Effects
Canva offers a range of additional effects and adjustments to enhance your green screen editing. You can apply filters, adjust brightness, contrast, and saturation, and even add text or graphics to your composition. Explore the various editing options in Canva to add your personal touch to the edited footage.
Exporting the Edited Footage
Once you are satisfied with the green screen editing, it's time to export your final composition. Click on the "Download" button in the top-right corner of the Canva interface. Choose the desired video format and quality settings, and click on the "Download" button again to save your edited footage to your computer.
Conclusion
In conclusion, editing green screen footage in Canva is a simple and straightforward process. By following the steps outlined in this tutorial, you can easily replace the green background of your footage and create visually appealing compositions. Experiment with different backgrounds, effects, and adjustments to unleash your creativity and produce professional-looking videos. Whether you are a beginner or an experienced video creator, Canva provides a user-friendly platform to edit green screen footage and bring your vision to life. Start exploring the possibilities today!
No comments:
Post a Comment